Pages

To Order Items:

To order items, contact Sandy at southernsandy1@gmail.com.

Thursday, April 25, 2013

Calling All Teachers! How About a Clipboard?

My son's 2nd grade class intern is leaving this week and they're putting together a basket for her as a thank you.  The room mom sent home a clipboard, scissors and paperclip dispenser and I customized them all.  Okay, y'all, how cute did this turn out? Sorry for the poor picture taking...I didn't have enough hands.  This was me with poster board propped in one hand and my phone in the other.

Monday, April 22, 2013

Situation Room

My friend asked me to cut the words "Situation Room" for her home.   It's about 36" long. She put it on her craft/sewing room door.  I think it's absolutely hilarious.  My son suggested we put one on the bathroom door.  LOL We both cracked up at that!

Friday, April 19, 2013

Cusom Hand Sanitizers in Great Colors!


These are for a friend of mine for Teacher Appreciation week at her school.  I'm so pleased with how they turned out.  I can't decide which one I love more!  The navy/yellow with the chevron ribbon is so on-trend and adorable.  And, you can't go wrong with pink/green or the black/white.  I'm working on two more for her in pink/orange and brown/pink color combinations.  I can't wait to see those too!

Wednesday, April 17, 2013

Cute Little Note Pad

This was a quickie project but it is amazing how one detail elevates a something from average to unique and personal.  This is a cute notebook from Michael's which I added a first name initial too.  I have some others and could put a monogram or a full name on them.  I'm using Janda Chunky for the font which I totally adore.

Friday, April 12, 2013

Teacher Appreciation Idea

This is a cute teacher appreciation idea!  A personalized hand sanitizer, hand soap, and ruler.  I made these at the request of my son's room mom. (shhh...they're for the intern, don't tell her! ;)  Not all initials look great in every font so I looked through quite a few for a good 'V'.  Cute, floral ribbon is always a nice finishing touch.

Thursday, April 11, 2013

Car Decal

This was a real change for me.  I cut a St@r W@ars decal for a friend of mine at work.  It's called a Mandalore.  I'm not familiar with it but it turned out great.  Above is a picture after I cut it so you can see the design.  Below is a picture of it installed on his car window.  He wanted black so it would be subtle. I have to say it's wicked cool!


Monday, April 8, 2013

Personalized Tumblers


Two tumblers that I made for my son's Cub Scout leaders as thank you gifts.  The personalization represents their personality.  The bottom cup has the cute neon vinyl which I adore with the lime green.

Thursday, March 28, 2013

Rockets, Race Cars, & Jets - Oh My!


I'm a little late on this post but I made these picks for the Cub Scout Blue & Gold Banquet back in February.  They are simple outlines cut in card stock and glued back-to-back on bamboo skewers.  The possibilities are endless.  I put them in pre-made Dollar Store centerpieces.  You could also put a bunch in mason jars with rocks in the bottom.  We needed 35 or so inexpensive and easy to make centerpieces so this fit the bill perfectly.

Our theme was speed so I was on the lookout for "fast" designs.  I found the .jpegs on the internet and stripped out the details so it would cut solid.   Next on my agenda, is to cut something in miniature and make cupcake picks.  How cute would that be? 

Friday, March 22, 2013

Hoppy Easter!

I adore this cute bunny peep.  He's sweet whatever size I cut him in.  For this quickie project, I made some hand soaps for my sister, mom, and mother-in-law.  I finished it by putting it in a clear bag and tying the neck with a bow in matching ribbon.  It's just not pictured because it made the image hard to see when I photographed it.  LOVE!

Thursday, March 21, 2013

Car Monogram - I Finally Did It!

I finally did it!  I monogrammed my car with my initials.  I used the neon pink vinyl that is my current vinyl love.  I'm pretty pleased with how it turned out. My car is a dark grey so I think this compliments it nicely.  Since this is the thicker Oracel 651, I used the wet application method.  It went on perfectly! Email me at southernsandy1@gmail.com if you want one!

Monday, March 11, 2013

Pinewood Derby Awards & Wet Application

Lots of stuff going on lately.  I had another Cub Scout project.  It was time for our yearly Pinewood Derby and I made the chargers/plates again for the "Best of" categories.  I scored some great NEON yellow vinyl which rocked on the black chargers. It's Oracel 651 instead of the usual 631 I have used before.  I got completely frustrated with the application.  I had soooo many bubbles and I tried 5 times and it was a mess every.single.time.  Finally, I posted a question on a crafting blog and someone recommended using the "wet application" method.  From what I can tell, it's basically how vendors that install on cars and trailers do it.  It worked like a dream!  I was so surprised.  You just need a squeegee and a spray bottle with water and a few drops of dish soap.  A spritz on the application surface and the exposed adhesive of your design are all it took.  Best of all...NO bubbles!  I just can't give out items that don't look as good as I can make them.  I will definitely using that application method again!

Tuesday, February 19, 2013

Cub Scout Blue & Gold Prizes


My sister found these cool wooden chargers for me so I used them as prizes for the Cub Scout Blue & Gold banquet dessert contest.  The theme was "speed" and I found this cool free font to cut the word speed in.  I love when you find a font that meshes so well with the description!  The boys absolutely love winning these. 

Wednesday, February 13, 2013

Valentines & Pinterest Fatigue Syndrome?

Is 6 projects in two weeks too many?  Maybe.  Nonetheless, I find myself hopelessly addicted to Pinterest.  I made my son's Valentines this week.  Better Homes & Gardens actually posted this cute Starburst valentine.  The Cupid's Arrows came from Family Fun magazine.


Friday, February 1, 2013

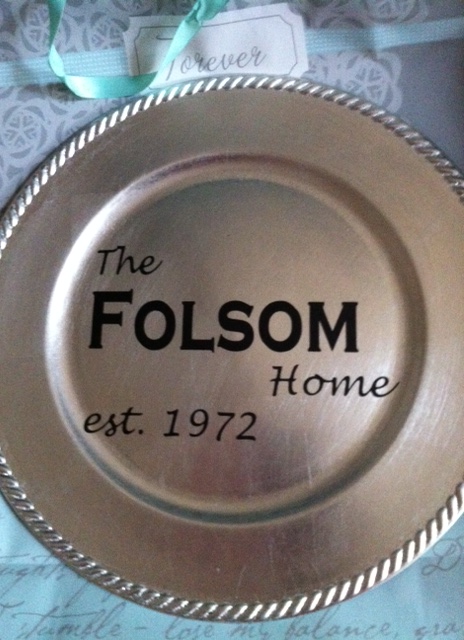
Family Charger


I've made several of these family chargers over the last year or two.  I made this one for a 40th Anniversary gift for friends of ours.  I tend to favor the silver but they are equally as pretty on a gold charger.  Really, I think any color could be beautiful if it goes with your decor.  I used the Copperplate font because for the name because it's bold and all capital letters - the first letter is a regular capital and the rest are small capitals.  The script is Lucida Handwriting.  It cuts nicely and I like that it is easy to read.  I usually give the charger with a plate stand so it can be displayed.  

If you look back to last year, I've also made chargers for Cub Scout events like the Pinewood Derby ( http://www.southernsandy.blogspot.com/2012/03/pinewood-derby-time.html).  You wouldn't think little boys would like something like that but they were thrilled.

Thursday, January 24, 2013

Valentine's Candles


Every time I try something new, I find myself totally in love with the new concept.  This time, I vinyled directly onto candles.  It is so pretty.  I can't wait to try some more ideas.  These are candles I made for the upcoming Valentine's Day holiday.  My favorite is the one that says I love you in french...it's so elegant.  What a sweet way to tell your significant other that you love them!  Plus, who doesn't like setting things on fire!  hahaha  My first candle was crooked so it's on my dining room table and my boys are obsessed with lighting it every night at dinner.  We've been eating by candlelight every night.  Message me if you are interested in one for yourself.

Friday, January 18, 2013

Damask Cards


I made these using Cricut's Damask cartridge.  I am absolutely in love with it. I've also cut a few damask designs in vinyl and the are gorgeous.  You can also cut the envelopes which I did for a couple.  They take a whole piece of card stock so after the first few, I just ran to Hobby Lobby and picked up a package of plain white 4" envelopes.  I figure the card is the most important part.  All of these are cut on shimmery card stock which is absolutely fabulous.  I also did a few in black and white which is stunning in its simplicity.  The only downside to the black is that the inside of the card is black so you'll need a silver or gold pen to write. I'm not even sure that's a downside, the mad-crafter in me kind of digs writing in silver or gold! 

Tuesday, January 15, 2013

Baby Silverware with Name


I would like to give a shout-out to my friend Mary who I borrowed this idea from.  THANK YOU Mary!  My boys are too old for this but I would have loved it for a baby.  It's two forks and spoons in a handy container that is perfect for a diaper bag.  You never have to worry about not having a clean spoon or fork when you need it. 

Wednesday, January 9, 2013

Water Bottle with Monogram

I've been getting lots of requests for these awesome Thermos water bottles.  Most of the time, I'm putting the name down the side in a large font. This time, I put a monogram on it.  I'm really digging the monograms.  Inbox me if interested. They come in clear with a colored top available in white, plum (pictured), black, and teal.  

See a picture of the other water bottles I made at:  http://www.southernsandy.blogspot.com/2012/12/water-bottles-with-name.html

Monday, January 7, 2013

Family Name Frame

I'm pretty thrilled with how this project turned out.  You start with the frame of your choice.  We used black because black and white is such a classic color combination; it goes with everything.  This frame is 14" wide and 11" tall.  Originally, I tried to reverse the name and adhere it on the back.  It looks cool but what a nightmare.  Just put it on the front.  It looks great and so much easier to do.  The family name goes on first in the larger black letters.  The first names are on top in script.  I follow convention and put the mother's name, father's name, then children in birth order.  I chose to glue the glass in and remove the backing so the wall color would show through.  You could also put either fabric or black/white family photos behind it.  I think both would look nice.  I am making these for sale; if you are interested inbox me at southernsandy1@gmail.com.  

Wednesday, December 19, 2012

Personalized Storage Box

I have made several of these for a variety of requests.  This turned out particularly cute with the  black and white flowers and hearts.  It's for a young girl so I decorated it that way.  Although, I wouldn't mind this for myself.  Who can't use another storage box?  If you're like me, there are constantly small items that need a place to live.  I've also done something similar for teacher appreciation with the teachers name on top.  Usually, I just do polka dots for the teachers which is more adult but still cute.  These are $10 each and made to order.  I can decorate it lots of different ways to suit the recipient.  Inbox me if you are interested.

Monday, December 17, 2012

Buffet Tiles


The gift has been given so I can blog about it!  These are buffet tiles I made from white corner tiles.  I've done them with silver vinyl or black vinyl in a variety of designs.  If you entertain, you can use these to label your food.  No more guessing what dishes are or which ones are vegetarian. I put a dry erase marker in the set and you simply write and erase on them. Inbox me at southernsandy1@gmail.com if you are interested.

Friday, December 14, 2012

Wooden Signs

My girlfriend requested a sign for her husband.  When he snores, she shuns him to the couch, hence the "shunning cave."  I thought it was hilarious and was excited to try out a new design.  These wooden signs are so cute and the possibilities are endless. I started with a cut board, drilled holes and painted it beige.  I used black vinyl on it.  Beige and black are a classic color combination.  A twisted wire hanger and raffia bow just give it that added dimension and rustic quality.  Email me if you are interested in one at southernsandy1@gmail.com. 

Wednesday, December 12, 2012

Silver Ornament with Stars

I made the another ornament, this time I used starts instead of dot.  The ornament is a matte red finish with silver stars and the child's name and year on it.  The stars were a special order and it turned out spectacular. 

Tuesday, December 11, 2012

Water Bottles with Name

Check out his cool water bottle made by Thermos.  I put my boys names on them and they are awesome for school.  The black cap has a loop for clipping on to something and on the other side, a round button which makes the top pop open for drinking.  They especially love that...buttons are fun!  I also like that when you take the lid off, it has a nice opening that actually fits under my ice dispenser so ice doesn't fly everywhere.  They've been pretty practical for us.  I don't worry about them drinking out of anyone's bottle but their own.

White Candle with Capital Initial

I customized this soy candle with a friend.  I love the ornate, swirly detail of this particular font.  It makes an elegant statement! 

Friday, December 7, 2012

Christmas Ornament

I absolutely love this matte green with hot pink.  This features a girls name and on the back the year "2012".  I put polka dots for a little more interest.  I'm also going to make this in red with silver.  I'll post a picture of that when I have one.

Wednesday, November 14, 2012

Etched Redneck Wineglasses

Redneck wine glasses are all the rage right now.  I finally got the courage to make a set. They are fairly easy to make.  You can use the glass candle sticks and Kerr canning jars from the Dollar Tree.  I had some technical difficulty with the adhesive.  Most sites recommend E6000, however, no one had it in stock. The first adhesive I used which was an epoxy didn't work at all.  I had to scrub it off with mineral spirits. I ended up using a Locktite adhesive made for glass repair (like fish tanks) that I got at Lowes.  It actually worked like a dream and was easy to use.  After I let the adhesive cure, I cut an initial in vinyl.  I picked out the letter and left behind the frame.  Be careful putting the vinyl on the glass and get it stuck down completely with no bubbles or wrinkles so you get a nice clean edge to your initial.  Fill in the initial completely with etching cream using a sponge brush.  The sponge will give you much more even coverage than a regular paint brush (much better than the leftover kids paintbrush I tried the first time).  I let the etching medium sit longer than the directions said because I figured it couldn't hurt.  Rinse the glasses with warm water to get the etching medium off.  I also wash them with dish detergent because I like them to sparkle.  I'm saving a variety of sizes of jars to make some apothecary jars next!

Monday, November 5, 2012

Cute Thank You Card


I had an idea to do a fairly quick and easy thank you card for my son's birthday.  I took a picture of him holding a poster on my Iphone and emailed it to myself.  I printed the copies on photo paper from the Dollar Tree.  The most expensive part was the printer ink.  He's only 7 and so it was much easier for him to personalize the notes and sign them.  I think they turned out really cute!

Thursday, October 11, 2012

Thanksgiving Hostess Candle

I made this cute candle as a hostess gift for Thanksgiving dinner.  I thought the beige vinyl complimented the pumpkin colored candle nicely.  Of course, no jar candle is complete with out embellishment.  The raffia adds a little rustic flavor.   

Monday, September 10, 2012

Camping Sign


Well, I'm at it again.  There is nothing I love more than coming up with a new craft, especially with vinyl!  Our family bought a used pop-up camper at the end of May and we are loving it.  It's made our camping trips feel positively luxurious.  A lot of the camp sites have cute signs or flags out so I thought it was a perfect time to flex my creative muscles.  My great dad cut the wood out of scrap for me and gave me some old wire.  I wrapped it around a pencil to get that cute loopy look.  This particular sign was a gift to my girlfriend so I let her pick the designs she wanted.  I'm working on my own camping sign which will have a trailer graphic on it.  I'm super happy with how it turned out!

Monday, August 27, 2012

Water Bottle Favors

My son turned 7 on Friday and we hosted a birthday party at the local skating rink.  I always struggle to come up with a party favor that is inexpensive and useful.  This year, I am so pleased with the idea.  I found these totally adorable water bottles at the Dollar Tree.  I decided to personalize each child's name on the bottle using the Janda Chunkygirl font.  It's my new favorite font.  It cuts pretty well using SCAL and the Cricut Expression.  The bottles were hand-wash so adding the vinyl was fine.  Inside, we stuffed an individual drink mix, a couple of candies, and one balloon (per the request of the birthday boy). 

Monday, June 25, 2012

Spinach Salad with Craisins

I went to Costco last week to buy drinks for the office and stopped into the deli section for a salad for lunch.  I found the most amazing salad and have since recreated it twice for work lunches.  I didn't take a picture of it because it was in my ratty storage containers and didn't look all that pretty.  It was tasty and simple!  You start with a generous helping of spinach - luckily, this was buy one get one free last week and this week at Publix.  Add bacon bits, tomatoes (I had some fresh vine-ripened cherry tomatoes from my garden), and mozzarella cheese.  Their salad had red onion and at home I only had sweet vidalia so I used that - both were equally delicious.  Don't forget a generous handful of craisins and top the whole concoction with Poppyseed dressing.  Their tartness really sets off the Poppyseed dressing (Ken's dressing was BOGO last week too).  The salad I bought had hard-boiled eggs on the side which I didn't make again.  This will definitely stay in my recipe box for a fun change to sometimes boring salads!

Thursday, May 31, 2012

Customized Cup for a Teacher


I customized this cup for a my niece's tutor.  It is hot pink and lime green vinyl using the "Janda ChunkyGirl" font.  I cut a big 3" G in hot pink and then overlaid "Mrs. Garcia" in the lime green.  Polka dots and rings of various sizes go all around the cup.  Usually I would put ribbon on the straw but this was a rush job and I'm out of it at the moment (Yay - a trip to Hobby Lobby! :)  I'm pleased with the result.


Thursday, May 17, 2012

30th Birthday Basket

I love Pinterest.  I'd been searching all over the place and found several ideas to celebrate my friend's 30th birthday.  Thank you for all the inspiration!  This is a picture of the basket I created.


It started with the teal wineglasses I had etched below and grew from there.  In the back, is a bottle of wine with a tag that says "When all else fails, drink a glass of wine."  I decided a basket was required to hold it all and I scored this adorable black canvas basket at T@rget with a white floral design. 

In the back is a little pot with 30 lollipops and a tag that says "30 Doesn't Suck."  The front tag with "Give yourself a makeover" is attached to a bag with lip gloss and two finger nail polishes.  The tiara has a tag that says "Play dress up." 

Finally, in the back is a customized candle tagged with "take a bath by candlelight."


I wanted to give a thoughtful, personal gift.  What do you think?

Thursday, May 10, 2012

Glass Etching


Last night, I etched glasses.  I found these adorable teal stems at an estate sale a couple of weeks ago and wanted to try out a new design I read about on Pinterest.  I used etching medium I bought at a local hobby store.  

First, with clean classes, I made my design.  For the polka dots, I used hole re-inforcers.  Do you remember those?  We used to put them on our notebook paper when the holes were torn.  They worked great!  They are the perfect size and much easier to work with than vinyl. You want to stick them down firmly so none of the etching medium gets under the edges.  I'm a random gal, so I put them all over with no specific pattern.  Next, fill in the centers with etching medium.  Put it on thick.  My experience is that if you don't use it generously, the etching can be mottled looking.  After letting it sit for a while (the directions say 5-7 minutes), I usually let it sit longer, rinse it under warm water.  The hole stickers come off at the same time so it's a quick process.   You are finished. 

For the line, I used a ruler and marked all the way around the glass.  Then I put painter's tape around the glass connecting the marks.  I did this twice to make either side of the stripe I was going to etch.  I had a really hard time getting it straight and it looks pretty good in the picture but the back is a little bit messier.  I don't know if I'll do the stripes again.  I really like the look but getting that straight edge and line is hard.  Again, layer on the etching creme THICK.  I think this is key to getting a consistent look.  After the requisite waiting, rinse with warm water and take off the tape. 

Overall, I'm really happy with the final result.  These are going in a gift basket for a friend turning 30 this weekend.  I'll post a picture of the gift basket too.

Wednesday, May 9, 2012

Teacher Appreciation Gifts!

Teacher Appreciation gifts are done!  It's always a relief to send these to school.  I have two very experienced teachers so I tried to make the gifts practical and cute.  The box is about 6 inches deep so I think it has a lot of function.  On the right are a bottle of hand soap (clear) and a bottle of hand sanitizer (green).  I usually just get these items at the Dollar Tree but for some reason, I just could not get the adhesive off the hand sanitizer bottles.  I tried Goo Gone, finger nail polish remover, soap and water, and rubbing alcohol.  I finally decided that my time must be worth more than hours of scrubbing and went to Wally World and got a different brand.  The label came right off that one.  The bigger font is "Curlz" and the ruler has "Teen".  Our school color and symbol is the green shamrock (leprechauns) so I scored some excellent St. Patrick's Day ribbon on clearance to use.

Tuesday, May 8, 2012

Teacher Appreciation School Supply


A big shout-out to my friend Mary over at http://ifonlyihadtimeto.blogspot.com/ for the cutest ruler idea ever for Teacher Appreciation week.  Simple to make and turned out very sweet.  Used "Teen" font and black vinyl.  My boys are very excited to take these to school for their teachers!

Tuesday, April 10, 2012

Happy Easter!


What says Happy Easter more than dyeing eggs?   How about a new vinyl project?  I'm on it.  I found these charming egg-shaped platters at Target for $2.50 each in 3 different colors (lilac, teal, and pink).  Pink, of course, being the in-demand color.  I found this adorable peep svg out there and hijacked it for my purposes.  I gave one to my mom, sister, and mother-in-law.  They all loved them!

Tuesday, March 13, 2012

Pinewood Derby Time!

We had our annual Pinewood Derby!   It's always a highlight of the Cub Scout year.  This was my younger son's first Pinewood Derby.  He was beyond thrilled.  He took home a 2nd place trophy for speed and a prize for the most futuristic car in the show category.  Talk about a happy little boy!

Sadly, his brother didn't place but he still had a good time.  


It was also a chance to show off my mad vinyl skills with the show category prizes which I vinyled white letters and flags onto shiny black chargers.  Bryson has been carrying the "plate" he won around everywhere.

Friday, February 24, 2012

Ryan's 10th Birthday Party!

It was a sports-theme but really, it was a Pinterest birthday!  All Pinterest ideas.  First, I made the ball cupcakes.  I only made footballs, basketballs, and baseballs.  The soccer ball I attempted looked like an eyeball so I stopped after one.  They turned out pretty cute and the boys were excited to pick the ones they liked.

Sorry, it's sideways...it keeps defaulting this way.
 I also made rainbow fruit skewers.  The boys absolutely loved those.  I used strawberries, oranges, pineapple, green grapes, blueberries, and purple grapes.  The recipe called for cantaloupe for the orange fruit and that would have been better.  The oranges were a  huge mess to cut but tasty!

Finally, we made the zip lock baggie soft-serve icecream.  It was hilarious.  The kids were a lot more impressed with this activity than I was expecting.  It was fun to have something active to do that actually accomplished something.  (In front of the boys in the picture, I didn't get a good close-up of it.)  I think they were as thrilled with the toppings as anything - gummy worms, chocolate chips, and sprinkles.